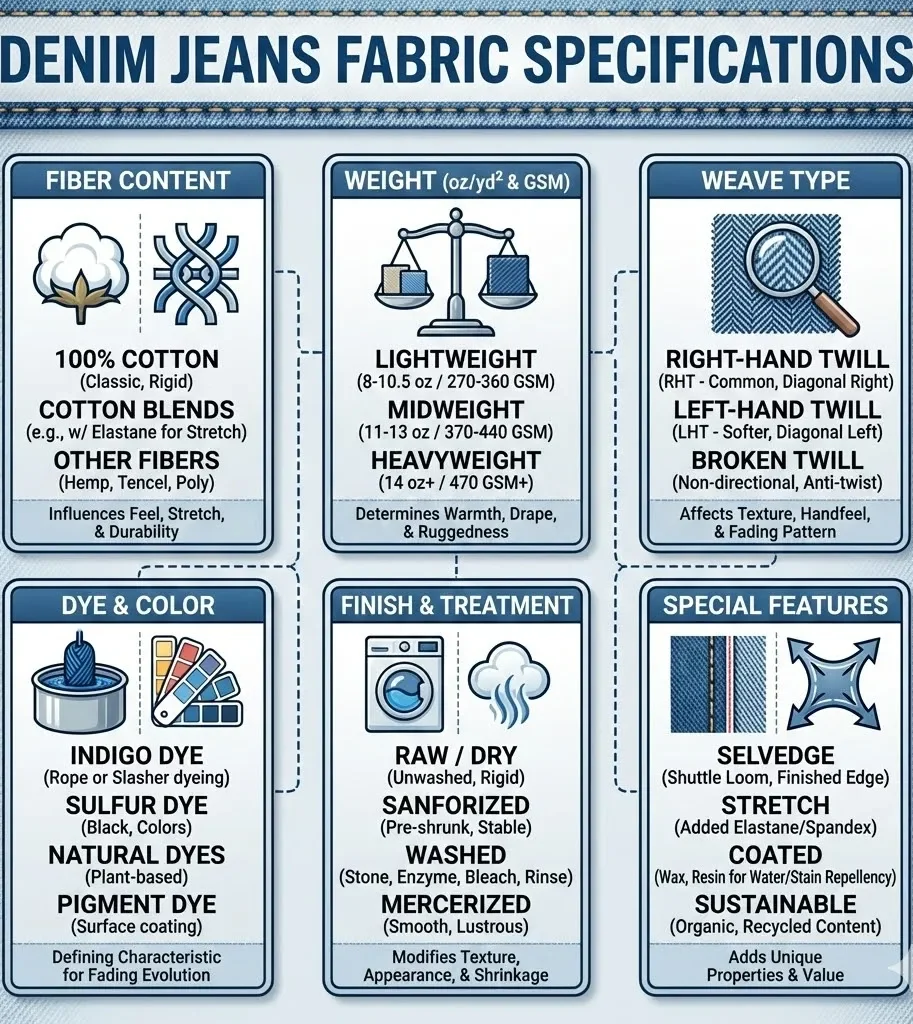

👖 Denim Jeans Fabric Specifications
1. Before Anything: What is Denim?
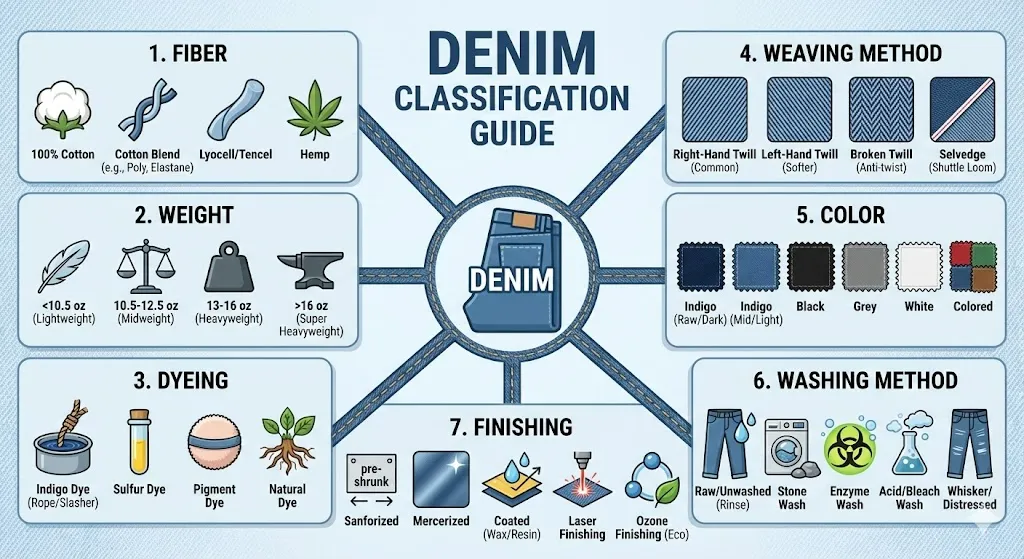
Denim is a sturdy cotton warp-faced twill where the weft passes under two or more warp threads, creating the diagonal rib that makes denim “denim.”

2. Why Your Spec Sheet Matters
In jeans development, your fabric spec is not “a description”—it’s the document that decides whether you’ll get leg twist, knee bagging, crotch blowouts, or crocking complaints in bulk.
3. How to Use This Section (Step-by-Step)
- Pick the closest “default configuration” below based on your fit/use.
- Copy it into your PO/spec sheet as the starting baseline.
- Adjust only 3–5 lines (wash assumption, stretch targets, shade policy, and performance endpoints) after your PP + wash trial.
👖 Best Default Spec Recipes
1. Classic Straight / Vintage Raw Jeans
(Structure + Fade First: Heritage hand, strong fade potential, stable silhouette.)

| Weave | 3/1 Twill (Right-hand or Left-hand) |
| Weight | 12–14 oz/yd² (≈ 410–475 GSM) |
| Fiber | 100% Cotton |
| Yarn Style | Ring-spun (character) OR Open-end (uniformity/cost). |
- Shrinkage: Warp ≤ 3%, Weft ≤ 3% after agreed wash method.
- Skew/Twist: Define max skew after wash; must test post-wash.
- Indigo: Rope dyed indigo preferred for layered fading.
- Crocking: Require dry/wet rubbing performance by method.
2. Stretch Slim Jeans
(Recovery + Anti-Bagging First: “It stays fitted after real wear.”)

| Weave | 3/1 Twill or Broken Twill (controls torque) |
| Weight | 10–12.5 oz/yd² (≈ 340–425 GSM) |
| Fiber | Cotton + Elastane (Comfort 1–2%; Power stretch higher) |
- Stretch Targets: Specify target elongation (weft), recovery % after set time, and growth limit.
- Seam Durability: Add seam strength strategy for crotch (high failure zone).
3. Workwear / Abrasion-First Jeans
(Durability Hero: Workwear, cycling, outdoor, uniform.)

| Weave | 3/1 Twill or Stable Broken Twill |
| Weight | 13–16 oz/yd² (≈ 440–540 GSM) |
| Fiber | 100% Cotton or Cotton/Poly Blend (Stability/Drying) |
- Abrasion: Use a recognized method like Martindale (ISO 12947-2).
- Tear Strength: Use ISO 13937-2 (trouser tear method).
4. Lightweight Summer Jeans
(Breathability + Drape First: “Cool + Soft + Drapey” > Extreme Durability.)

| Weave | 2/1 Twill (Softer hand and drape) |
| Weight | 7.5–10 oz/yd² (≈ 255–340 GSM) |
| Fiber | Cotton or Cotton/Lyocell (Test abrasion!) |
Lightweight denim shows problems faster: sheerness, seam puckering, leg twist.
The Fix:
Write usable width, shrink method, and wash assumption clearly.
👖 Start with Jeans Fit & End Use (Stress Zones Decide the Spec)
Jeans specs should be built like an engineering map: stress zones → failure modes → fabric parameters. The key zones are seat, thigh/inner thigh, knee, and crotch—these decide your priorities.
1. Straight / Relaxed: Balancing Abrasion with Silhouette Stability
Straight and relaxed fits look forgiving, but they expose two high-frequency problems in bulk:
- Leg twist / skew after wash (especially if finishing is unstable).
- Inner-thigh abrasion (real wear, real returns).
- Choose weight band first (12–14 oz is the safest “all-season classic” for most programs).
- Decide if twist control is needed: if your target customer hates spiraling seams, test broken twill early.
- Write skew limits in the PO (don’t use vague words like “low skew”).
- Validate post-wash using your intended wash recipe (rinse vs enzyme vs stone changes outcomes).
2. Slim / Skinny: Set Stretch & Recovery Targets to Prevent Knee Bagging
Skinny jeans succeed or fail on one line: growth control. The trap is thinking “higher stretch = better comfort.” It often means more permanent deformation unless recovery is engineered and validated.
- Define whether the product is comfort stretch (wearable) or power stretch (shape-driven).
- Specify stretch direction (usually weft stretch; bi-stretch is riskier if uncontrolled).
- Write stretch + recovery + growth targets (not just elastane %).
- Run a wear simulation before TOP approval:
- cycle stretch → rest → re-measure growth
- wash using your recipe → re-measure again
- Approve based on post-wash and post-cycle performance, not only handfeel.
3. Workwear / Cycling / Outdoor: Abrasion, Tear, and Seam Strategy Hierarchy
Workwear jeans are not “just heavier denim.” A 15 oz fabric can still fail if construction is loose or finishing destroys strength.
- Abrasion resistance (inner thigh + knee)
- Tear resistance (pocket, crotch, seam edges)
- Seam durability (crotch seam strength and seam slippage risk)
- Dimensional stability (shrink + skew)
- Colorfastness (still important, but typically not #1)
- Put “Performance” before “Aesthetics.”
- Reference abrasion method with endpoint logic: ISO 12947-2 defines the breakdown endpoint inspection procedure.
- Reference tear method: ISO 13937-2 describes trouser tear force determination.
- Add a garment note: “High abrasion zones require reinforcement stitch plan” (fabric spec + garment spec must match).
4. Women’s / High-Rise: Recovery, Comfort, and Size Stability
High-rise jeans are more sensitive to small drifts: if fabric grows, the waist loses hold; if recovery is weak, the seat sags.
- Tighter growth limits.
- Stricter dimensional stability after wash (method + tolerance).
- A clear “no shade-mixing within one garment” policy (high-rise panels show mismatch clearly).
5. Kids / Fast Fashion: Minimum Acceptable Line (Don’t Get Trapped by Returns)
Even for cost-driven programs, write a “minimum acceptable” line so you don’t debate quality in bulk:
- Minimum shrink tolerance by method.
- Minimum rubbing fastness by method.
- Seam durability check requirement.
- Inspection standard and defect definitions.
A simple “minimum line” saves you from endless post-bulk negotiation.
🧥 vs 👖 Jeans vs denim jacket: why the spec logic is different (don’t copy jacket numbers)
You can reuse the structure of your denim jacket spec sheet, but jeans need different priorities because the load pattern is different.
1. Jeans stress zones: seat, thigh, knee, crotch
Think of jeans as a “repeated mechanical system.” Every step stretches the knee. Every seated motion stresses seat seams. Every walk cycle rubs inner thighs. That’s why jeans specs must explicitly control:
- abrasion resistance (inner thigh)
- growth/bagging (knee + seat)
- crotch seam durability (failure hotspot)
2. Jeans failure modes are more visible: leg twist, bagging, seam cracking, blowouts
A jacket can “hide” small skew. Jeans can’t: a few mm twist becomes a visible spiral seam. A few % growth becomes saggy knees.
Your spec needs to prevent:
- leg twist after wash
- knee bagging after cycling
- seam opening and crotch blowouts
- crocking and staining claims (especially dark indigo)
3. Jeans need stricter abrasion & tear language in the PO (how to write it)
“High abrasion.”
“Abrasion resistance tested to Martindale; endpoint and acceptance criteria agreed.”
ISO 12947-2 defines how breakdown endpoint is determined by inspection.
“Strong tear.”
“Tear strength tested using trouser method; minimum tear force targets agreed.”
ISO 13937-2 describes the trouser tear method.
4. Stretch & recovery matters more than jackets (jeans are a cycle machine)
Jeans bend at the knee thousands of times. Recovery has to survive cycles, not just one pull. That’s why jeans require explicit stretch/recovery/growth clauses.
Later, when you mention “color transfer and staining,” you’ll link to:
and use method references like ISO 105-X12 for rubbing fastness.
Use it only to say: “Jeans can’t copy jacket specs because stress zones and growth control are different.”
⚖️ Recommended denim weight (oz/GSM) — by season, fit, and wash
Weight is not “quality.” Weight is your engineering budget: structure, drape, thermal comfort, and durability all live inside that budget.
1. Lightweight jeans (spring/summer): “not see-through, not sweaty”
What buyers get wrong: they try to fix sheerness by only increasing oz. But opacity also depends on cover factor (construction density, yarn size, finishing).
- Start at 8.5–9.5 oz if you want true summer comfort.
- Use 2/1 twill if drape is important.
- Validate pocket show-through and seam puckering in PP wash trials.
- Write usable width and shrink method clearly—lightweight denim magnifies instability.
2. Mainstream everyday jeans: safest commercial weight band
This is the most forgiving range for: rinse wash programs, moderate enzyme/stone looks, and general retail fits.
- Choose 11–12.5 oz as the “mass market safest” start point.
- Tune handfeel via finishing rather than pushing oz up/down.
- Test crocking early if you’re using deep indigo.
3. Vintage/heavy jeans: when it’s worth it—and when wear experience backfires
- The story is heritage/raw.
- Customers accept break-in discomfort.
- You want sharp structure and premium perception.
- You require heavy distressing (wash can destroy strength).
- Your customer expects softness day one.
- You don’t control shrink/skew (heavy fabrics can twist hard if finishing is unstable).
4. Workwear abrasion-first jeans: weight isn’t “the” durability lever
A tighter 13 oz denim can outlast a loose 15 oz denim in inner thigh abrasion.
- Tighter construction and stable finishing.
- Yarn quality and twist control.
- Abrasion method endpoint and acceptance rules in PO (not marketing words).
5. Weight × wash interaction: heavier distressing often means larger strength loss
As a simple rule: the more aggressive your wash (stone/acid/bleach), the more you must treat strength as a controlled variable—not an assumption.
- Pick weight for intended season + structure.
- Pick wash for appearance.
- Run wash trial on bulk-likely fabric.
- Re-test abrasion/tear after wash.
- Lock PO numbers only after post-wash validation.
🏗️ Weave / structure specs (abrasion, leg twist, and handfeel)
Twill basics: twill weaves create diagonal ribs and can be classified by stepping, direction, face yarn, etc.
- how it fades
- how it twists
- how it survives abrasion
1. 3/1 vs 2/1: durability vs comfort tradeoff in jeans
- 3/1 twill: classic denim look and structure, often better for heritage programs
- 2/1 twill: often softer and drapier, popular for lightweight/fashion jeans
- If durability and structure are primary → start with 3/1.
- If breathability and drape are primary → start with 2/1.
- Validate inner thigh abrasion and seam behavior after wash.
2. Right-hand vs left-hand: handfeel, hairiness, abrasion feel
You can treat this as a controlled experiment rather than a vibe choice:
- pick two fabrics equal in weight and composition
- wash both with your intended recipe
- compare:
- softness and surface hairiness
- leg twist behavior
- abrasion wear at inner thigh
- decide based on your product promise (heritage vs comfort vs durability)
3. Broken twill: why it’s common for jeans (torque / leg twist control)
Broken twill is often chosen because it can reduce visible leg twist in jeans. If your customers complain about spiraling seams, broken twill is a practical lever.
- don’t just write “broken twill”
- attach a reference swatch and define post-wash skew limits as pass/fail
4. Slub / crosshatch: premium texture vs “defect” disputes (make it auditable)
Slub sells—until QC calls it barre or streaking.
- attach an approved physical swatch as the “texture standard”
- define what counts as unacceptable (e.g., severe bars, repeated streaks, panel mismatch)
- state whether shade band mixing is allowed (usually not within one garment)
- include inspection language and defect definitions
5. Selvedge vs non-selvedge: value story vs bulk consistency
Selvedge can be a premium story (and a premium cost), but it adds risk:
- less cutting efficiency
- more pressure on panel matching and consistency
- more visible shade differences if shade band control is weak
- decide if selvedge is a marketing hero or just a detail
- if it’s a hero: require tighter shade band policy and bulk cuttable approval
- if it’s not: avoid the complexity and maximize repeatability
🧵 Fiber Composition and Elasticity Rules (The “Core Battleground” for Trousers)
Jeans fabric is judged by what happens after 30 wears, not what it feels like on a hanger. That’s why composition decisions should always be made with two questions in mind:
- Will it hold shape (growth/bagging control)?
- Will it survive abrasion (inner thigh + knee)?
Below is how to make those choices in a way that’s actually executable in a PO.
1. 100% Cotton — vintage fades + structure, but how to solve comfort
- Heritage/raw programs where fade character and “crisp structure” are the selling points.
- Straight, relaxed, and wide-leg fits where comfort comes from pattern ease, not fabric stretch.
⚠️ Where it can fail:
- Customers expect “stretch comfort.”
- Hot climates: heavy 100% cotton can feel stiff and warm unless weight + finishing are tuned.
- Choose a realistic weight band for the target wearer (don’t go heavy just for marketing).
- Write shrinkage tolerance with the wash method (rinse/one-wash vs raw/loomstate changes the reality).
- Add a skew/leg-twist limit after wash (jeans are visually unforgiving).
- Decide if you want a character yarn (ring-spun) or a more uniform look (open-end).
2. Comfort stretch — how to set 1–2% elastane (avoid “too soft” or “too baggy”)
Comfort stretch is the “most commercial” stretch zone—if (and only if) you control recovery and growth.
- Better mobility and comfort without turning jeans into leggings.
- Easier fitting across body variation.
❌ Cons:
- If recovery is weak, you get knee bagging and saggy seat.
- Over-soft finishing can make it feel great on day one and fail by day thirty.
- Define fit category first: slim vs skinny vs straight.
- Specify stretch direction: usually weft stretch only.
- Write the stretch + recovery + growth lines into the PO (not just “2% spandex”).
- Approve fabric only after wash trial + wear simulation (you’ll do the protocol in the Stretch & Recovery section).
3. Power stretch — higher stretch, higher risk (recovery, growth, size drift)
Power stretch can be a hero product, but it’s also where disputes happen most.
- High comfort and strong “fit hugs the body” promise.
- Great for women’s skinny/high-rise when controlled.
❌ Cons:
- Higher growth risk (bagging) if elastic system isn’t stable.
- Size drift and “fit inconsistency” become common bulk complaints.
- More sensitive to finishing and washing.
Power stretch programs should treat “recovery and growth control” like a safety standard—non-negotiable.
4. Bi-stretch vs one-way stretch — what it changes in fit and pressure
One-way (weft) stretch is usually easier to stabilize for jeans.
Bi-stretch adds comfort but increases the risk of:
- pattern drift (garment measurement creep),
- seam stress shifting in unexpected ways,
- inconsistent fit feel across sizes.
- If you’re scaling a mainstream jeans program: start with weft stretch.
- Choose bi-stretch only if you have a clear comfort reason (e.g., very fitted silhouette).
- For bi-stretch, require separate targets in both directions and validate post-wash.
5. Cotton–poly blends — stability + fast-dry vs fade/handfeel tradeoffs
- Workwear/uniform programs that need better stability and quicker drying.
- Cost control programs where consistent bulk appearance matters more than “vintage fade storytelling.”
⚖️ Tradeoffs:
- Fade behavior may feel less “classic.”
- Handfeel can be less natural unless finishing is tuned.
- Confirm the brand promise: durability/stability vs heritage fade.
- Put dimensional stability targets (shrink + skew) at a higher priority.
- Run wash trials early to confirm the desired look still works.
6. Tencel/Lyocell blends — softness and drape, but protect abrasion + seams
These blends are popular for softer, drapier jeans—especially wide-leg and summer programs.
- Softer handfeel and nicer drape.
- Cooler wear feel in warm weather.
❌ Cons:
- May reduce abrasion durability if not engineered well.
- Seam durability must be verified (especially at crotch and pocket corners).
- Keep your weight realistic (don’t go ultra-light if durability is required).
- Require abrasion + seam durability validation after wash.
- If it fails, adjust construction/yarn or shift the blend ratio.
🤸 “Actionable” Tips for Stretch & Recovery (Preventing knee bulging and stretching out after prolonged wear)
If you only write “2% elastane,” you are buying a composition, not a performance. Jeans buyers need to buy behavior.
1. Jeans targets explained — elongation, recovery, growth (bagging)
- Elongation (stretch %): how far it stretches under load
- Recovery: how much it returns after load is removed
- Growth (bagging): permanent deformation after repeated wear
⚠️ A fabric can have high elongation and still be bad jeans fabric if recovery is weak.
2. Recommended target ranges by fit (practical buyer approach)
Instead of giving one “magic number” for all jeans, set targets by fit category:
- Skinny: strict growth limits + high recovery priority
- Slim: balanced targets (comfort + stability)
- Straight/relaxed: lower stretch is acceptable; stability and abrasion may matter more
- Start with candidate fabric targets from the mill.
- Validate with your own wash recipe + simulation protocol.
- Only then finalize the PO numbers.
3. Root causes of knee bagging — fabric vs pattern vs finishing (who owns what)
- Fabric system: recovery too low, growth too high
- Pattern system: too much knee ease (the garment doesn’t need to stretch, so it sags)
- Finishing system: over-softening and heavy enzyme/stone routes reduce stability
Write responsibility boundaries in your development notes:
- Fabric must pass growth/recovery tests
- Garment must meet post-wash measurement tolerances
- Wash house must follow approved recipe (no substitutions)
4. Wear simulation validation — cycle stretch + heat/humidity + wash (step-by-step)
This is the “feels like real life” protocol your team can actually run.
- Step 1 — Prepare test pieces: Cut test strips from bulk-likely fabric (don’t use tiny swatches). Mark gauge length clearly.
- Step 2 — Cycle stretch: Stretch to a defined extension (based on your target fit tension). Hold, release, and repeat for a defined number of cycles.
- Step 3 — Rest + measure: Rest the specimen for a set time. Measure residual deformation (growth).
- Step 4 — Wash using your recipe: Run the same wash method you plan for production (rinse, enzyme, stone, etc.). Dry the same way.
- Step 5 — Re-measure + decide: Re-check growth and recovery post-wash. Approve only if it holds shape after both cycling and wash.
5. Write stretch rules into the PO (method, conditions, pass/fail)
- stretch direction (weft vs bi-stretch)
- elongation target
- recovery target after defined time
- growth limit after cycle test
- wash condition used for validation
- clear pass/fail wording
⚠️ If any of those are missing, you’ll negotiate quality in bulk instead of controlling it.
🧶 Yarn Specifications (count, twist, spinning method – affecting abrasion resistance and pilling)
Yarn decisions look “technical,” but they directly control the buyer outcomes:
- abrasion wear speed
- surface hairiness (and crocking feel)
- texture consistency
- the “premium vs uniform” visual
1. Yarn count ranges by weight (jeans edition)
- 7.5–10 oz denim: typically finer yarns / lighter constructions
- 10–13 oz denim: broad mainstream range (balanced yarn sizing)
- 13–16 oz denim: coarser yarns and/or tighter constructions
- Ask the mill for warp/weft yarn count and density (EPI/PPI) in the construction sheet.
- Confirm whether count is Ne (English cotton count) or another system.
- Set tolerances if your program is consistency-sensitive.
2. Ring-spun vs open-end — abrasion, hairiness, cost, vintage look
- Ring-spun (common perception):Often more character, more “heritage” story. Can show more natural variation (good or bad depending on your buyer).
- Open-end (OE):Often more uniform and cost-efficient. Can perform well when engineered properly.
- If your program sells “heritage character,” test ring-spun early.
- If your program sells “repeatable bulk consistency,” OE is often easier to control.
- Validate with wash trial + abrasion wear comparison (inner thigh).
3. Compact / combed options — when they truly improve consistency
- you need cleaner surface, fewer random streaks
- you’re facing bulk repeat issues and want better control
- you’re selling a “premium stable” product, not just a look
⚠️ Don’t pay for premium yarn processing if your wash route is aggressive enough to destroy the benefit.
4. Slub / uneven yarn — specify texture without creating “defects”
Slub is a style choice until QC calls it a defect.
- Approve a physical reference swatch as the “texture standard.”
- Define what counts as unacceptable (severe bars, repeated streaks, panel mismatch).
- Write inspection rules and panel matching rules.
🎨 Dyeing Methods and Color Difference Control (Trousers are more susceptible to “uneven fading” and “color transfer complaints”)
Jeans don’t just have “a color.” They have a fade system and a transfer risk system. Your spec has to control both.
1. Rope-dyed indigo — layered fades, but crocking risk must be written
Rope-dyed indigo is popular because it creates layered fading. But indigo programs often face rubbing transfer complaints.
- ISO 105-X12 is a method for determining resistance to rubbing.
- AATCC TM8 is designed to determine color transfer by rubbing.
- Specify the indigo dye route (rope dyed indigo).
- Define crocking expectations by method (dry + wet).
- Align finishing route (over-softening can increase apparent transfer).
- Add care/consumer expectation notes if needed (especially for deep indigo).
2. Sulfur black/grey — undertone control and batch discipline
Black and grey jeans are where “same black” becomes a serious bulk problem:
- greenish cast, reddish cast, inconsistent depth
- Define color standard (lab dip approval).
- Define allowable shade range (with an agreed evaluation method).
- Require strict lot control and labeling for cutting.
3. Overdye / garment dye — fashion-first, consistency risk
Garment dye can be very profitable in fashion, but you must write:
- acceptable shade range
- shrink and distortion expectations
- trim staining rules (zippers, pocketing, labels)
If you don’t, you’ll fight “why is this batch darker?” disputes forever.
4. Shade band + lot control — how to avoid left/right leg mismatch
This is the most practical jeans rule that prevents buyer returns:
- Require rolls to be labeled by lot and shade band.
- Write: No mixing shade bands within one garment.
- Approve bulk cuttable fabric before bulk cutting.
- For multi-panel styles, add panel matching checks at cutting.
🧼 Washing and Finishing Assumptions (Pants appearance = determined by washing process; specifications must be clearly stated)
Jeans appearance is often a wash-house product as much as a fabric product. If you don’t specify wash assumptions, you can’t hold bulk stable.
1. Raw / rigid — how to write shrink, twist, fade expectations
Raw denim can be a dream product—but only if expectations are written clearly.
- Loomstate vs sanforized status (if applicable).
- Shrinkage tolerance after the agreed wash method.
- Skew/leg twist limits after wash.
- Crocking expectations and care guidance.
- Approvals: bulk cuttable + PP with wash baseline.
2. Rinse / one-wash — the safest commercial baseline
Rinse wash is often the best foundation for stability:
- reduces shrink surprises
- reduces twist surprises
- makes fit more repeatable
“Rinse/one-wash baseline is the standard approval condition; all measurements and performance tests use this condition.”
3. Enzyme / stone wash — strength loss and appearance tolerance
Enzyme/stone routes change handfeel and appearance—but can reduce strength. You must connect wash to performance:
- Define the wash reference (photo + physical reference).
- Define acceptable appearance variation band.
- Re-test abrasion/tear after wash trial (don’t assume greige performance equals washed performance).
- Lock the PO only after post-wash validation.
4. Acid / bleach — strength, colorfastness, hole risk acceptance
These looks are high drama and high risk.
- acceptable strength loss range (agreed program tier)
- acceptable shade variation range
- acceptable “damage” definition (holes, tearing, weak areas)
⚖️ Industry case (external): why sandblasting matters in jeans specs
If your jeans program includes heavy distress looks, write a compliance line that avoids hazardous finishing routes. In 2010, H&M and Levi Strauss & Co. announced a global ban on sandblasting across their supply chains.
This concern aligns with documented occupational health risks associated with denim sandblasting (silicosis cases reported in Turkey).
“Finishing methods must comply with buyer’s restricted processes; sandblasting is prohibited; alternative distress methods require buyer approval.”
(That’s enough to protect you without turning your spec into a legal document.)
5. Resin / 3D / fixation finishing — anti-bagging vs harsh hand / cracking risk
Resin/3D finishes can help shape retention, but they can also:
- make the fabric feel harsh
- create cracking or crease mark issues
- increase consumer complaint risk if not balanced
- Use resin as a tool only if growth control is not achievable via fabric system alone.
- Validate by wear simulation + wash trial.
- Write care and durability expectations.
6. Coated jeans — look first, but write durability and care limits
Coated denim behaves like a composite system. Your spec needs:
- coating type description
- crack resistance expectation
- care restrictions
- acceptable surface change after abrasion
🏭 Factory experience #1 (first-person, detailed and “real-life”)
On one bulk jeans program (slim fit, deep indigo), the customer complained that the left and right legs looked like different blues after washing. At first, the factory team assumed it was “wash house inconsistency.” But when we pulled the roll records, we discovered the real cause: shade band mixing at cutting.
🛠️ What we did (step-by-step)
- We re-checked the fabric receipts and found that two shade bands were delivered under the same style order.
- We traced the cutting tickets and confirmed cutters mixed rolls to reduce waste—no one wrote a “no shade mixing” rule in the PO.
- We created a new cutting control:
- roll labeling by lot + shade band
- “no mixing shade bands within one garment”
- one shade band per cutting batch
- We negotiated with the customer transparently:
- We offered to re-cut the most visibly mismatched sizes.
- We agreed on a controlled shade range for the rest, and marked them as a separate batch.
- Internally, we added a QC checkpoint before cutting: if shade bands differ, production must request buyer approval before proceeding.
✅ Outcome
The next bulk run was stable—because the problem wasn’t “bad denim.” It was missing shade band control language. That one PO line prevented a repeat dispute.
🛡️ Performance targets (jeans-specific: abrasion, tear, crotch seams, and pilling)
If you want denim jeans fabric specifications that survive real wear, don’t start with aesthetics—start with failure modes. Jeans usually fail in four places:
- Inner-thigh abrasion (holes)
- Crotch seam stress (blowouts / seam opening)
- Knee and seat growth (bagging)
- Rubbing transfer (crocking complaints)
Below is the performance module you can copy into a PO and then tune by product tier.
1. Abrasion resistance — how to set targets for knee/thigh/seat
Abrasion is your #1 durability KPI for jeans, especially for slim fits and workwear.
- Use a recognized abrasion method and define an endpoint rule. ISO 12947-2 specifies how the Martindale test endpoint (“specimen breakdown”) is determined by inspection intervals.
- Don’t write only “high abrasion.” Write: method + cycles + endpoint + acceptance.
- Decide the wear risk: fashion / mainstream / workwear.
- Choose your target zone: inner thigh and knee are the priority zones in jeans.
- Ask the mill for baseline Martindale results.
- Repeat abrasion testing after your intended wash (stone/enzyme can reduce strength and surface integrity).
- Lock a pass/fail line in the PO.
“Abrasion resistance: Martindale method; endpoint defined as specimen breakdown by inspection intervals per ISO 12947-2; target cycles: ____; tested on fabric after the approved wash condition.”
2. Tear strength — pocket edges, crotch, and side seams
- pocket corners
- crotch stress points
- seam edges after aggressive washing
- Identify which style details raise tear risk (tight fits, distressed looks, heavy washing).
- Require tear testing on washed fabric, not only greige.
- Set a minimum tear force target aligned with your product tier.
3. Seam slippage + crotch seam strength — why jeans are more sensitive
Jeans are seam-stress machines. Even “good denim” can fail if seam behavior isn’t controlled.
- A seam slippage requirement (so the fabric doesn’t pull apart at stitch lines)
- A crotch seam strength requirement (so you don’t get blowouts)
- Include seam slippage in the fabric spec module (not only in garment tech pack).
- Run stitch tests on bulk-likely fabric after wash.
- If failures appear, fix the system: fabric density + sewing thread/needle + seam construction.
4. Dimensional stability — shrinkage tolerance + skew/leg twist control
Jeans look wrong when they twist. Your PO must define:
- shrinkage tolerance (warp/weft)
- skew/leg twist tolerance post-wash
- the exact wash method used for evaluation
AATCC TM135 is designed to determine dimensional changes of fabrics when subjected to home laundering procedures.
- Choose the wash condition you’re selling (raw/rigid vs rinse vs enzyme/stone).
- Test shrinkage and skew after that condition.
- Write tolerances + test reference into the PO.
5. Colorfastness minimums — washing + dry/wet rubbing (crocking)
Jeans get more complaints about rubbing transfer than many other categories—especially deep indigo and sulfur blacks.
- ISO 105-X12 specifies a method for determining resistance to rubbing off and staining other materials (dry and wet rubbing).
- AATCC TM8 is designed to determine the amount of color transferred by rubbing (dry and wet).
- Decide whether the program is “fade-friendly” or “transfer-minimized.”
- Choose your rubbing method reference (ISO 105-X12 or AATCC TM8) and set target grades.
- Re-test after your finishing route (softeners can change perceived crocking).
- Add a shade band rule (see the defect section) to prevent panel mismatch.
🔍 Common jeans defects (and how to prevent them inside the PO)
You don’t prevent defects by yelling at QC—you prevent defects by writing auditable rules.
1. Leg twist / skew / spiraling seams — what to test and how to write limits
- unstable finishing
- unbalanced construction
- torque effects amplified by washing
- Require skew measurement post-wash.
- Define max allowable skew (numbers, not adjectives).
- If your customer hates twist: consider broken twill and validate in PP wash trials.
- Block “wash substitutions” at the wash house unless buyer approves.
2. Left/right leg shade mismatch — shade band + cutting discipline
This is the fastest way to turn a normal bulk run into a returns nightmare.
“No mixing shade bands within one garment. Rolls must be labeled by lot + shade band; cutting must keep each garment within a single shade band.”
3. Barre / streaks / weft bars — root cause and acceptance rules
- Approve a “bulk cuttable” reference standard (physical swatch).
- Define what counts as unacceptable (repeated bars, visible streaks on panels, obvious patterning).
- Add inspection language (4-point + defect mapping where needed).
- Require roll-to-roll consistency rules (no uncontrolled substitutions).
4. Severe crocking (rub-off) — target grades + corrective route
- method-based target (ISO 105-X12 or AATCC TM8)
- finishing discipline
- buyer expectation alignment for deep indigo
5. Knee bagging / long-wear growth — fabric vs pattern vs finishing boundary
Your PO should define fabric responsibility (growth/recovery), while the tech pack covers garment measurement and pattern logic.
“Stretch & recovery targets apply after wear simulation and after the approved wash condition; fabric must meet growth limit ____.”
(You already laid out the simulation protocol in Part 2—this is where it becomes enforceable.)
6. Sewing issues (needle breaks, puckering, skipped stitches) — fabric causes you can control
- overly hard resin finish
- unstable width/shrink behavior
- uneven handfeel across rolls
- excessive surface hairiness interacting with stitching
- Run sewing trials on bulk-likely fabric after wash.
- If issues appear, isolate whether it’s finishing hardness, construction instability, or inconsistent lots.
- Update PO: add finishing bounds and lot discipline.
📏 Width, usable width, and marker efficiency (the hidden cost lever)
Width is not a detail—it’s a cost multiplier.
1. Standard fabric width for jeans and how to confirm usable width
- Ask for both nominal width and usable/cuttable width (selvage and edge variation reduce usable width).
- Confirm usable width after finishing (some finishes tighten or distort edges).
- Write: “usable width minimum ____” into the PO.
2. How width affects consumption, waste, and cost
- Wider usable width can reduce yardage per garment and reduce marker waste.
- Narrower widths can raise cost even if the fabric price per yard looks cheaper.
3. Narrow width / selvedge jeans — premium story vs industrial repeatability
Selvedge programs can work beautifully, but require stricter controls:
- shade band discipline
- cutting control
- consistent roll labeling
4. Shrink allowance changes the marker plan
If shrink is real (and it is), you must build it into:
- pattern sizing decisions
- marker planning
- post-wash measurement targets
📝 How to write a denim jeans fabric spec sheet (PO template)
A good spec sheet prevents arguments because it turns taste into numbers. Also, it should define denim clearly—denim is a sturdy warp-faced twill where the weft passes under two or more warp threads, creating the diagonal rib that distinguishes it.
1. One-line naming formula (jeans version: include stretch/recovery)
“____ oz (____ GSM) ____ twill (3/1, 2/1, broken twill), ____ fiber %, ____ warp/weft yarn count, ____ finish, ____ wash assumption, ____ stretch/recovery targets, ____ shade band rule”
This one line instantly reduces mistakes when multiple “similar denims” exist.
2. Structure block — fiber %, weave, yarn count, density, weight, width
- fiber composition
- weave and direction (3/1, 2/1, broken twill, RHT/LHT if needed)
- warp/weft yarn count and density
- weight in oz and GSM
- nominal width + usable width + tolerances
3. Stretch block — elongation, recovery, growth + test condition
- stretch direction
- elongation target
- recovery target (after set time)
- growth limit after cycling
- “tested after approved wash condition”
This is how you make “anti-bagging” real.
4. Color block — dye method, shade standard, shade band policy
- dye route (e.g., rope dyed indigo for jeans)
- lab dip approval rules
- shade band labeling
- strict “no mixing shade bands within one garment” rule
5. Finishing + wash block — preshrink, resin/3D, softeners, wash assumption
- whether preshrunk
- softener/resin/3D expectations and limits
- the exact wash baseline used for measurement and performance claims
6. Test block — abrasion, tear, seams, shrink/skew, colorfastness (methods + targets)
- ISO 12947-2 for abrasion endpoint definition (Martindale).
- ISO 105-X12 for rubbing fastness (dry and wet).
- AATCC TM135 for dimensional changes after home laundering.
7. Inspection + acceptance block — 4-point, defect definitions, roll labeling, traceability
- inspection system
- defect definitions and how you’ll judge them
- roll labeling rules (lot + shade band)
- traceability requirements
8. Approval process — lab dip → lab sample → bulk cuttable → PP → TOP
- Approve lab dip (color standard).
- Approve lab sample / strike-off.
- Approve “bulk cuttable” fabric (not just a hand swatch).
- Approve PP garment in the real wash baseline.
- Approve TOP sample for final bulk lock.
This sequence is what keeps “good sampling, bad bulk” from happening.
🍲 Spec recipes by end use (copy-paste ranges)
The point of recipes is speed: they give your buyer a reliable baseline, then you adjust by wash + fit + market tier.
1. Classic vintage raw jeans recipe (fade + structure)
Use when your selling point is heritage character.
- weight: classic mid-heavy band
- 100% cotton
- 3/1 twill
- strict shrink + skew definitions post-wash
- explicit crocking expectations (method-based)
- strict shade band rule
2. Everyday comfort jeans recipe (balance stability and comfort)
Use for mass retail and repeatable bulk.
- moderate weight band
- comfort stretch system with defined recovery/growth
- rinse/one-wash baseline recommended
- stable shade band and lot control
3. High-stretch skinny recipe (recovery + anti-bagging)
Use for fitted styles where returns spike if knees bag out.
- define stretch + recovery + growth targets in PO
- validate with wear simulation + wash baseline
- stronger seam behavior requirements (crotch seam strength, seam slippage)
4. Workwear abrasion-first recipe (abrasion + tear + seams)
Use for uniforms, outdoor, cycling.
- abrasion-first performance section
- method-defined abrasion endpoint (ISO 12947-2)
- method-defined shrink evaluation (AATCC TM135)
- strict lot control and repeatability focus
5. Lightweight summer jeans recipe (drape + breathability)
Use for warm-weather fashion.
- lighter weight band
- drape-friendly structure
- watch seam behavior + opacity
- be disciplined about stability post-wash
💰 Cost drivers and sourcing notes (so the spec matches the budget)
Cost is a function of yarn, dyeing, structure, finishing, testing, and compliance—not just weight.
1. What increases cost (and what’s actually worth paying for)
- yarn upgrades (combed/compact)
- dye route and shade control discipline
- special finishing (resin/3D/coating)
- extra testing and compliance demands
- stricter lot discipline and traceability
- when it prevents bulk returns (shade mismatch, bagging, blowouts)
- when it improves repeatability (fewer reworks)
📊 Industry data reference (external): material volumes as a sourcing context
When you’re deciding between 100% cotton and cotton/poly blends for stability and cost control, it helps to understand fiber market reality.
Textile Exchange’s Materials Market Report includes global fiber production figures and fiber shares.
2. MOQ, lead time, and sampling plan for jeans programs
- Confirm MOQ by construction and dye route.
- Build time for lab dip and bulk cuttable approval.
- Run PP and TOP with the real wash baseline.
- Don’t rush shade band discipline—most expensive mistakes happen there.
3. Supplier question list (quickly filter weak mills)
- Can you provide abrasion results (before and after wash) with method references?
- How do you label and control shade bands in bulk?
- What is your standard control plan for shrink and skew after finishing?
- Can you support stretch/recovery/growth targets and validate after wash?
- What is your corrective action path if bulk fails crocking or shade consistency?
4. How to trade parameters for savings (what you can relax, what you can’t)
- minor cosmetic tolerances (within agreed band)
- certain premium yarn upgrades if your wash route is aggressive anyway
- shade band control
- dimensional stability definitions
- stretch/recovery/growth rules (for fitted jeans)
- abrasion performance (for workwear/cycling)
🏭 Factory experience #2 (first-person, detailed and outcome-focused)
On a stretch slim jeans program, we started getting a cluster of complaints after wear tests: crotch seam failures and early inner-thigh wear. The fabric felt perfect in hand—soft, comfortable, and the fit looked great in PP—but real wear exposed a weakness we hadn’t locked down in the PO.
- We reproduced the failure instead of debating it. We ran a controlled wear simulation (cycling + wash) and then checked the crotch seam area for seam opening and localized wear.
- We separated fabric problems from sewing problems. We tested seam behavior on the washed fabric and found the issue was not “bad stitching”—the fabric construction and finishing were allowing seam stress concentration and faster abrasion in the inner thigh.
- We ran a wash comparison. The approved wash route (enzyme + strong softening) was amplifying softness but reducing resistance in the highest-friction zones.
- We negotiated a solution with the customer rather than hiding the tradeoff:
- Option A: keep the ultra-soft handfeel, accept a lower durability tier (not acceptable for their market)
- Option B: slightly tighten the fabric system and moderate finishing to protect performance (chosen)
- We implemented changes:
- Updated the fabric construction to improve stability and seam behavior (tighter build in the weft and a more stable finishing balance).
- Added a clear denim jeans seam slippage requirements line and a denim jeans crotch seam strength target in the PO (method + pass/fail language).
- Required abrasion validation after wash (Martindale endpoint definition per ISO 12947-2).
- We re-approved bulk using the same approval flow: bulk cuttable → PP → TOP, all in the real wash baseline.
The revised bulk held up in wear simulation and customer trials, and we avoided a “fit vs durability” argument by turning it into measurable spec lines: abrasion after wash, seam behavior targets, and recovery/growth control.
🏁 Conclusion
Well-written denim jeans fabric specifications are what turn a “nice-looking sample” into repeatable bulk jeans that fit the same, fade the same, and survive real wear.
The most common bulk disputes…
- leg twist
- knee bagging (growth)
- crotch seam failures
- inner-thigh abrasion
- and crocking transfer
…are not random; they’re predictable outcomes of missing or vague spec lines.
🚀 The path to enforceable specs:
- Start with end use and fit
- Lock the engineering basics (weight, weave/structure, fiber + stretch system)
- Make the spec enforceable with method-based testing, shade band control, and a clean approval flow (bulk cuttable → PP → TOP).
If you do that, your denim jeans fabric specifications stop being a description and become a manufacturing control system—one that reduces claims, stabilizes lead time, and protects your brand consistency at scale.
❓ FAQ (Denim Jeans Fabric Specifications)
1) What is the best denim weight for jeans?
For most everyday jeans, 10–13 oz/yd² (≈ 340–440 GSM) is the safest commercial range. Go lighter (7.5–10 oz) for summer drape, and heavier (13–16 oz) for heritage/workwear—only if your wash route won’t destroy strength.
2) What is the best denim weight for skinny jeans?
A common starting range is 10–12.5 oz/yd² (≈ 340–425 GSM) so the jean can stretch comfortably without feeling too heavy. The real key is not weight alone—it’s recovery and growth control after wear and wash.
3) How do I prevent knee bagging in stretch jeans?
Don’t rely on elastane % only. Write stretch + recovery + growth limits into the PO, then validate with a wear simulation (cycle stretch → rest → wash → re-measure). Approve only if it still holds shape after that process.
4) What stretch percentage is best for jeans?
It depends on fit. Comfort stretch (often around 1–2% elastane) is common for mainstream slim fits. Higher stretch can work for skinny styles, but only if recovery is strong and growth is tightly controlled in testing.
5) Why do jeans twist after washing (leg twist / skew)?
Leg twist often comes from construction torque and finishing instability that shows up after laundering. Control it by specifying skew/leg twist limits post-wash, testing under your wash baseline, and considering structures like broken twill if twist sensitivity is high.
6) What is “shade band control,” and why does it matter for jeans?
Shade band control prevents left/right leg mismatch and panel-to-panel color differences. Your PO should require rolls labeled by lot + shade band and state: no mixing shade bands within one garment.
7) What is the most important durability test for jeans?
For many programs, abrasion resistance is the most important because inner-thigh wear is a common real-life failure. For fitted jeans, add seam behavior controls (crotch seam strength + seam slippage) because seams fail before fabric tears in many cases.
8) What shrinkage tolerance should I set for denim jeans?
A typical commercial target is warp ≤ 3% and weft ≤ 3%, but the exact limit must be tied to the approved wash condition (raw vs rinse vs stone wash). Always write the method and condition alongside the tolerance.
9) How do I write a denim jeans fabric spec sheet that suppliers can actually follow?
Use a modular layout: Structure (fiber/weave/yarn/weight/width) + Stretch (targets + method) + Color (dye + shade band rules) + Finish/Wash assumptions + Testing (methods + targets) + Inspection/acceptance + Approval flow. Avoid vague words like “high quality” without numbers and test references.
10) What causes crotch blowouts, and can fabric specs help?
Yes. Crotch failures are usually a system issue: fabric seam behavior, pattern stress, wash/finish effects, and sewing construction. Fabric specs help by requiring seam slippage limits, crotch seam strength expectations, and validating performance after the intended wash—not only on greige fabric.